Support
The CMS comes with several commonly used built-in Snippets.
| Snippet | Summary |
| Hyperlink | Basic internet hyperlink with optional inner image |
| Image | Basic image tag |
| MetaDescription | Meta description tag |
| MetaKeywords | Meta keywords tag |
To create a Snippet:
- Click the "Add Snippet" link button.
- Specify a name. Names must only contain alphanumeric characters and cannot contain spaces.
- Specify an optional description.
Once a Snippet is created, you will have the opportunity to customize the Snippet by 4 major sections:
Snippet Information
This section contains the follow general information about the Snippet:
- Preview image - Upload a preview image of the Snippet to be made available to content editors wherever the Snippet is used.
- Tag - A free form string value to group Snippets in the main listings view.
- Description - Description of the purpose and usage of the Snippet.
Template
Not to be confused with CMS Layout Templates, a Snippet Template is how a Snippet and it's Values should be rendered on the web site. There are two ways to provide a Template.
Inline Markup
When a Template is entered as inline, you can insert placeholder tokens in the desired location each Value or Snippet should appear. The format for these tokens are:
- {#Value["ValueName"]} - ValueName should reflect the name of the Value as it appears in the Snippet Items section. If there are multiple Values with the same name, for instance the global built-in Value of "RichText" is used several times, then the ValueName should be the Alt Name as assigned in the Snippet Items section. During rendering, if more than one Value is detected without any Alt Names, then only first Value is used.
- {#Snippet["SnippetName"]} - SnippetName should reflect the name of the Snippet as it appears in the Snippet Items section. During rendering, the child Snippet's Template will be evaluated and its resulting output will be replaced with the token placeholder.
Razor File
To use a ASP.Net Razor file (.cshtml) instead to provide the Template, provide the path to the .cshtml file. It is recommended to place .cshtml files in _private folders. Below is an example of a .cshtml file used as a Snippet Template.
@model ConnectedApps.Cms.Entities.Snippet.SnippetGroupViewModel

<div class="@(Model.Values["BlockColor"].Value.ToString()) @(Model.Values["ImageOrientation"].Value.ToString())">
  <div class="row">

    @if (Model.Values["ImageOrientation"].Value.ToString() == "Image-Left" && Model.Values["Image"].Value != null)
    {
        <div class="col-md-4 col-sm-4 col-xs-12 xs-hide">
          <img src="@(Model.Values["Image"].Value.ToString())" />
        </div>
    }
    <div class="@(Model.Values["ImageOrientation"].Value.ToString() == "Image-None"? "col-md-12" : "col-md-8 col-sm-8 col-xs-12" )">
      <h3>@(Model.Values["Title"].Value.ToString())</h3>
      @(MvcHtmlString.Create(Model.Values["Content"].Value.ToString()))
      @if(Model.Values["Link"].Value != null && Model.Values["LinkText"].Value != null)
      {
          <a href="@(Model.Values["Link"].Value.ToString())">@(Model.Values["LinkText"].Value.ToString())</a>
      }
    </div>
      @if (Model.Values["ImageOrientation"].Value.ToString() == "Image-Right" && Model.Values["Image"].Value != null)
      {
        <div class="col-md-4 col-sm-4 col-xs-12 xs-hide">
          <img src="@(Model.Values["Image"].Value.ToString())" />
        </div>
      }
  </div>
</div>
The rendering engine will pass the Razor view a model of type ConnectedApps.Cms.Entities.Snippet.SnippetGroupViewModel.

Figure 1.
Figure 1 shows the class diagram for the view model passed into the Razor file.
- LevelCount - The count of user defined values for the Snippet Group definition.
- OrderNumber - The current index of the Snippet value that is rendering.
- Values - Dictionary collection of Value content.
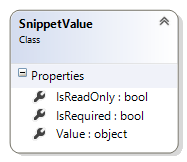
Figure 2.
Figure 2 shows the class representing the Dictionary value.
- IsReadOnly - Whether the Value was defined as read only.
- IsRequired - Whether the Value was defined as being required.
- Value - An object member that holds the actual value as provided by content editors. The value will be in the proper data type as defined and could possibly be NULL if allowed.
The benefits of using a custom Razor file as a Template are:
- More information about the context of the rendering such as LevelCount and OrderNumber members.
- C# control flow statements.
- More control in producing dynamic renderings.
Snippet Items
A Snippet item consist of either a Value or another Snippet.
To add a Value to a Snippet's Items:
- Click the "Add Element" link button.
- Click the "Value" radio button.
- Add a global Value by selecting it from the drop down list. Click the "Add Value" button.
- Create a new one time use Value by clicking the "Create New Value" button.
- Enter a Name for the Value.
- Select a data type to use for the Value.
- Finally, click the "Create New Value" button.
- The Value will be added to the list of items.
- Once created, you will have the opportunity to set additional Value properties.
To add a another Snippet to a Snippet's Items:
- Click the "Add Element" link button.
- Click the "Snippet" radio button.
- Select the desired Snippet in the drop down list.
- Click the "Add Snippet" button.
- The Snippet will be added to the list of items.
The order in which elements (Value or Snippet) in Snippet Items are shown to the content editor can be rearranged by dragging the element's handle and positioning it in the desired sort order.
Each element can be assigned an Alt Name by placing the cursor to the right of the element's Name. Alt Names are shown to the content editor and in the case of duplicate Values, are used as a token reference in a Snippet's Template.
If an element is a Snippet, then these additional settings are available:
- Optional - Indicates whether the presence of the Snippet is required. If checked, then Min and Max occurs are not evaluated until there is at least one Snippet added by the content editor.
- Min Occurs - The minimum number of times the Snippet can appear in the containing Snippet. 0 means there is no minimum. Default value is 0.
- Max Occurs - The maximum number of times the Snippet can appear in the containing Snippet. 0 means there is no maximum. Default value is 0.
If an element is a Value, then these additional settings are available:
- Value Settings
- Default Value (optional) - The value that will be used as the initial value when the Page item is created. The Default Value must adhere to the Value definition's data type.
- Required - If checked, then the Page module will require the content editor to provide a value in order to save the item. As well, if checked, then a Default Value must be provided.
- Read Only - If checked, then the value content cannot be edited by the content editor.
- Reg Ex Pattern (optional) - The regular expressions pattern the value content must match in order to be saved. Learn more about Regular Expressions.
- String Format (optional) - Format behavior that is applied when displaying the value content on the web site. Learn more about string formats.
- Edit Value Properties - a shortcut to editing the Value's properties.
Includes
Must like the Includes collection on a CMS Item, a Snippet can be configured to have Style and Script dependencies. Unlike the CMS Item's Includes, Snippet Includes do not undergo a publish event in order for them to take effect. Any change to a Snippet's includes are immediately effective. By registering includes on Snippets, you can build and package reusable modular blocks of HTML that encompasses how a content editor can provide values and how the resulting markup is presented by a web site visitor.